
Breakfast & Brunch
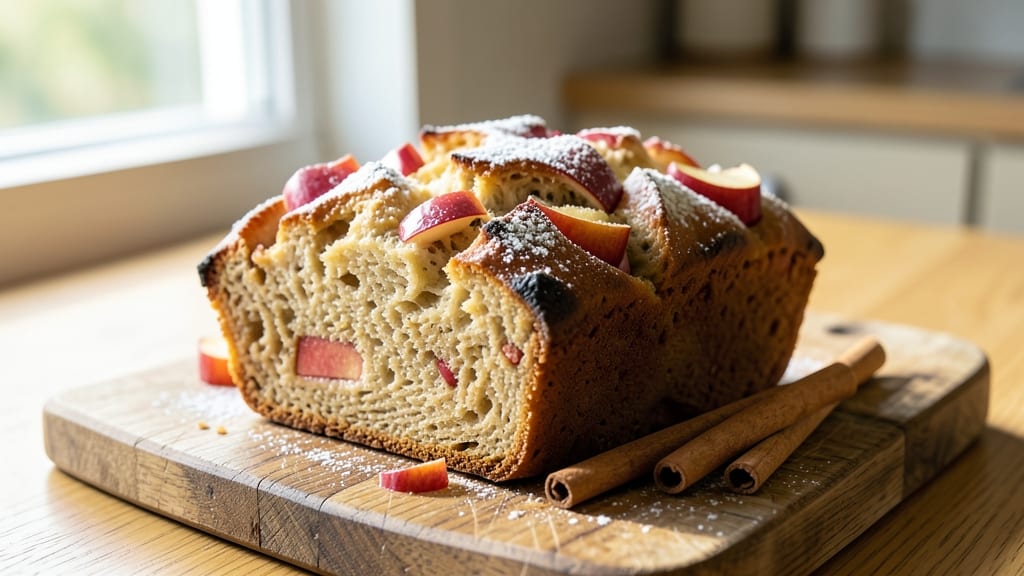
This apple breakfast bread transforms a simple morning into something special with its warm, cinnamon-spiced filling and tender, flaky layers. 🌟 The recipe combines a quick bread base with a gooey apple filling that bakes into golden perfection—ideal for breakfast or a cozy snack.
I developed this version to deliver restaurant-quality results in under an hour, making it perfect for busy mornings or weekend baking.
The secret lies in the balance of flavors: tart apples, warm cinnamon, and a touch of vanilla create a filling that's both comforting and vibrant. The bread itself is light and moist, with just the right texture to hold up to thick slices of filling.
You can use store-bought applesauce for convenience or fresh apples for a more rustic, flavorful twist.
By the time it emerges from the oven, you'll have a loaf with a golden crust, a tender crumb, and pockets of caramelized apple filling that make every bite irresistible.
This recipe is designed to be flexible—swap in different fruits, adjust sweetness, or even make it vegan with simple substitutions. It's the kind of dish that feels like a hug in bread form.
Serve warm with a pat of butter or a drizzle of honey for the ultimate breakfast experience. The aroma alone will wake up your kitchen—and your taste buds. Let's get baking!
Ingredients for apple breakfast bread
Fourteen ingredients for a loaf that smells like autumn mornings and tastes like comfort.
| Ingredient | Amount | Notes |
|---|---|---|
| All-Purpose Flour 🌾 | 2 ½ cups | Sifted for light texture |
| Granulated Sugar 🍚 | ¾ cup | White or brown preferred |
| Baking Powder 🧂 | 2 tsp | Freshly opened for lift |
| Ground Cinnamon 🌶️ | 1 ½ tsp | Warm, aromatic variety |
| Salt 🧂 | ½ tsp | Fine sea salt preferred |
| Unsalted Butter 🧈 | ½ cup | Cold, cubed for flakiness |
| Milk 🥛 | ¾ cup | Room temperature for blending |
| Large Eggs 🥚 | 1 whole | Room temperature for best mixing |
| Vanilla Extract 🌿 | 1 tsp | Pure, high-quality extract |
| Applesauce 🍎 | 1 cup | Unsweetened, store-bought or homemade |
| Diced Apples 🍏 | 1 ½ cups | Tart variety like Granny Smith |
| Brown Sugar 🍚 | ¼ cup | Packed for filling sweetness |
| Lemon Juice 🍋 | 1 tbsp | Freshly squeezed for brightness |
| Chopped Walnuts 🥜 | ¼ cup | Optional, for crunch |
The apples make or break this—Granny Smith or Honeycrisp are my go-tos for that perfect tart-sweet balance. Whole Foods or your local market usually have great apples, or grab a bag of pre-diced if you're short on time. The walnuts? Optional, but I always add them for that satisfying crunch. For the flour, King Arthur is my trusty brand—it's got that perfect balance of protein for a tender crumb. If you're using store-bought applesauce, check the label for added sugar—Mott's Unsweetened is my go-to for no surprises.
No applesauce? Mash up the diced apples with a pinch of cinnamon—it works just as well. Short on walnuts? Toasted pecans or chopped almonds are great swaps. The vanilla extract is non-negotiable here—imitation stuff tastes like perfume. For the butter, if you've got European-style, use it—it's higher in fat, which makes the layers extra flaky. And if you're feeling fancy, zest a little lemon peel into the filling for extra brightness. The spices? Penzeys or the bulk bins at Trader Joe's have the freshest stuff—worth it for this recipe.
This bread keeps 3 days in an airtight container at room temperature, but it's best fresh out of the oven. For leftovers, I like to slice it and freeze the pieces between parchment paper—3 months in the freezer, no problem. Reheat slices in a toaster or microwave for 10 seconds. Pro tip: Brush the top with melted butter right after baking—it keeps the crust from drying out. And if you've got extra filling, use it for pancakes or oatmeal the next morning.
Why You'll Love This Recipe
- No Mixer Needed: The dough comes together with just a fork and your hands—no stand mixer, no stress. Honestly, I’ve made this while chatting on the phone, and the texture still turns out light and tender.
- Warm Spice Magic: That cinnamon-sugar swirl? It’s the star. The bread stays soft with just a hint of sweetness from the apples, but the cinnamon makes every bite feel like a cozy hug—especially with a smear of butter.
- Breakfast or Snack: Slice it thick for a hearty breakfast with peanut butter or save the leftovers for lunch. Between us, I’ve even packed it cold for workdays—it’s that reliable.
- Budget-Friendly Staples: Flour, sugar, and cinnamon? Pantry basics that won’t break the bank. One batch feeds four, and the loaf keeps well for days, so you’re not scrambling for ideas.
Step-by-step instructions for apple breakfast bread
Here's how to make this fluffy, spiced loaf with a gooey apple filling—ready in under an hour!
👨🍳 Step 1: Mix the Dry and Wet Ingredients Separately
In a medium bowl, whisk together the 2.5 cups all-purpose flour, 0.75 cup granulated sugar, 2 tsp baking powder, 1.5 tsp ground cinnamon, and 0.5 tsp salt. Give it a quick stir to break up any flour lumps—this ensures even distribution when we combine everything later.
In a separate large bowl, melt the 0.5 cup unsalted butter over low heat (or microwave in 15-second bursts) until just liquid but not hot. Let it cool for 2 minutes, then whisk in the 0.75 cup milk, 1 whole large egg, and 1 tsp vanilla extract until smooth. Here's the thing—room temperature ingredients mix better, but don't stress if yours aren't perfectly warm.
🍳 Step 2: Combine Wet and Dry Ingredients
Gradually add the dry ingredients to the wet mixture, stirring with a wooden spoon or rubber spatula until just combined. You'll see a thick, shaggy batter form—this is normal! Overmixing develops gluten, which can make your bread dense. Once incorporated, fold in the 1 cup applesauce and 1.5 cups diced apples using gentle strokes to keep the fruit evenly distributed.
Here's a pro tip: If your batter feels too thick, add 1-2 tablespoons of milk to loosen it slightly. The batter should hold its shape when dropped from a spoon but still be pourable. This consistency gives you that perfect tender crumb while keeping the structure intact during baking.
🥘 Step 3: Prepare the Apple Filling and Layer the Loaf
In a small bowl, mix together the 0.25 cup brown sugar, 1 tbsp lemon juice, and 0.25 cup chopped walnuts (if using). This becomes your irresistible filling. Grease a 9x5-inch loaf pan with butter or line it with parchment paper for easy removal—this prevents sticking and makes slicing cleaner later.
Pour about half of the batter into the prepared loaf pan, spreading it evenly with a spatula. Then sprinkle half of the apple filling mixture over the batter. Top with the remaining batter, then the rest of the filling. Gently press down with the back of a spoon to help everything meld together. The filling will peek through the top—this is what makes it look so inviting!
🔥 Step 4: Bake to Golden Perfection
Preheat your oven to 350°F while you prepare the pan. Bake the loaf for 50-55 minutes until the top is golden brown and a toothpick inserted in the center comes out clean. Here's where patience pays off—don't open the oven door early to peek! The sudden temperature drop can cause the bread to sink.
I like to tent the loaf with aluminum foil after 30 minutes if it's browning too quickly on top. This ensures even baking without burning the crust. The internal temperature should reach 205-210°F for that perfect doneness—soft in the center but fully set around the edges.
⏰ Step 5: Cool and Serve Warm
Remove the loaf from the oven and let it cool in the pan for 10 minutes. Then transfer it to a wire rack to cool completely—this prevents sogginess. The bread will be warm but firm enough to slice after about 20 minutes. Here's the best part: it's even better the next day when the flavors meld together!
Slice into ½-inch thick portions and serve warm with a pat of butter or a drizzle of honey. The contrast of the warm, spiced bread with the cool, slightly tangy apple filling makes every bite irresistible. Store leftovers wrapped in plastic at room temperature for up to 3 days or freeze for longer storage.
Pro Tips For Making Apple Breakfast Bread
- Preheat the Pan: I learned this the hard way—skipping this step means your bread will steam instead of develop that golden, crisp bottom. Slide your loaf into a pan that’s been heating for 5 minutes at 375°F (190°C), and you’ll get that bakery-style crust without fighting for it.
- Toss Apples in Cinnamon: Dump your chopped apples into a bowl with a teaspoon of cinnamon and a pinch of salt before folding them into the batter. This keeps the apples from sinking to the bottom and ensures every bite has that warm, spiced flavor—no more dry pockets of fruit.
- Don’t Overmix the Batter: Stir just until the flour disappears. I used to beat this like pancakes, and the result? A dense, rubbery loaf. Two minutes max with a spatula—gentle enough to keep the texture light, but enough to blend everything evenly.
- Test for Doneness Early: This isn’t the prettiest method, but it’s the tastiest: tap the top of the loaf with your finger at 20 minutes. If it springs back slowly, it’s ready. Pull it out too soon, and you’ll end up with a gummy center—trust the finger test, not the recipe’s time.
Pro cooking tips for this dish
Perfect Pan Prep
Grease your 9x5-inch loaf pan with unsalted butter or line it with parchment paper for foolproof release. I swear by King Arthur flour for this recipe—it creates a tender crumb while holding up to the filling.
For extra insurance, brush the pan with melted butter after adding the batter. This prevents sticking and gives the crust a golden finish. 🧈
Batter Consistency
The ideal batter should be thick but pourable—like pancake batter. If it feels too stiff, add 1 tablespoon of milk at a time until it reaches that perfect consistency. Overmixing develops gluten, so stir just until combined.
I use a wooden spoon for this step because it helps distribute the apples evenly without tearing the batter. The goal is a shaggy texture that holds together but still spreads nicely in the pan.
Layering Technique
Spread the first layer of batter evenly, then sprinkle half the filling over it. This creates those beautiful pockets of caramelized apple throughout. For even distribution, use the back of a spoon to gently press down on the filling.
The filling should peek through the top—this is what makes it look so inviting when it comes out of the oven. Don't skip this step; it's what makes this bread special!
Baking Time
Bake at 350°F for 50-55 minutes—but here's the pro move: tent the loaf with aluminum foil after 30 minutes if the top starts browning too quickly. This prevents burning while ensuring the center cooks through.
The bread is done when a toothpick comes out clean and the internal temperature reaches 205-210°F. Patience here is key—resist the urge to peek early! 🔥
Cooling Strategy
Let the bread cool in the pan for 10 minutes before transferring to a wire rack. This prevents it from collapsing. The filling will be gooey when hot, so wait until it's fully set before slicing.
I like to brush the top with melted butter while it's still warm—this keeps the crust soft and adds extra flavor. The bread is even better the next day when the flavors meld together perfectly.
Apple Selection
Use Granny Smith or Honeycrisp apples for the best balance of tartness and sweetness. If you're short on time, pre-diced apples from the store work fine. For a more rustic flavor, mash 1 cup of diced apples with ½ teaspoon of cinnamon and use that as a substitute for applesauce.
The key is to keep the filling moist and flavorful—this is what makes every bite irresistible. 🍏
Nutrition facts
Frequently asked questions
Can I make this bread without applesauce?
Mash 1 cup of diced apples with ½ teaspoon of cinnamon and 1 teaspoon of lemon juice to replace the applesauce. This keeps the filling moist and adds natural sweetness. For extra flavor, add 1 tablespoon of brown sugar to the mashed apples.
How do I store leftovers?
Wrap the cooled loaf tightly in plastic wrap or store in an airtight container at room temperature for up to 3 days. For longer storage, slice the bread and freeze the pieces between parchment paper for up to 3 months. To serve, simply toast or reheat slices in the microwave for 10 seconds.
Why did my bread sink in the middle?
This usually happens if the bread wasn't fully baked or if you opened the oven door too early. Always bake until a toothpick comes out clean and the internal temperature reaches 205-210°F. Avoid peeking at the bread during the first 30 minutes—sudden temperature drops can cause collapsing.
Can I make this recipe gluten-free?
Yes! Replace the all-purpose flour with a 1:1 gluten-free baking flour blend like Bob's Red Mill. You may need to add ½ teaspoon of xanthan gum to improve texture. Keep all other ingredients the same, but expect a slightly denser crumb. For best results, use a gluten-free flour blend designed for baking.
What's the best way to reheat slices?
For crispy toast, pop slices in a toaster until golden. For a softer texture, warm in the microwave for 10-15 seconds covered with a damp paper towel. You can also reheat in a 350°F oven for 5-7 minutes wrapped in foil for even warmth. The filling stays gooey either way!