
Snacks
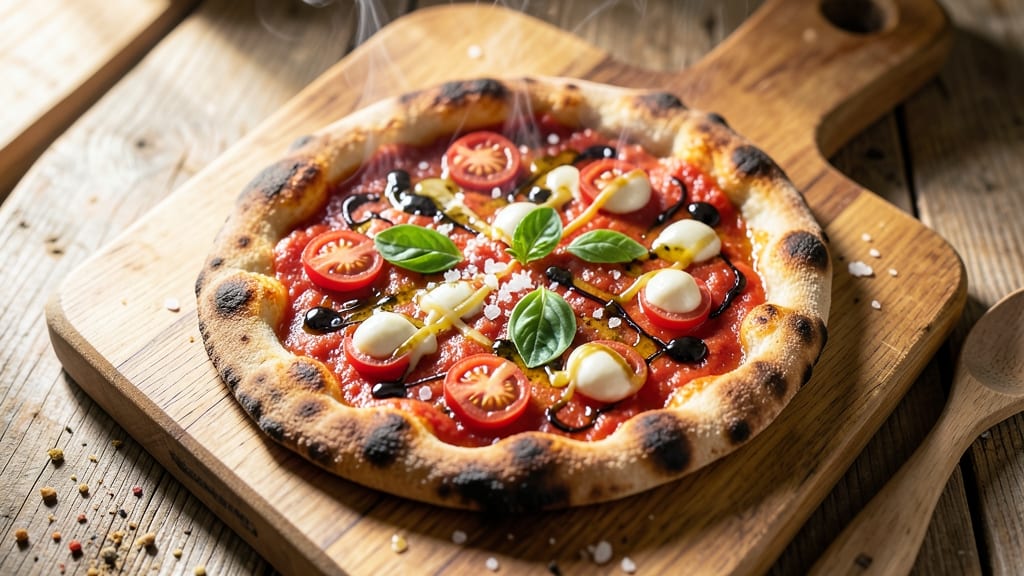
This artisan flatbread pizza delivers the perfect balance of crispy, wood-fired edges and a chewy, stretchy interior that feels like a cross between Neapolitan and Roman styles. The secret lies in a high-hydration dough that's hand-stretched for even thickness, ensuring every bite has that signature snap.
I've perfected this technique after years of experimenting with different hydration levels and baking methods—what you're about to make isn't just pizza, it's an experience.
The foundation starts with a simple but precise dough recipe using just flour, water, yeast, and salt—no fancy ingredients, just proper technique. After a long fermentation (overnight in the fridge), the dough develops incredible flavor and elasticity.
The real magic happens when you stretch it by hand, creating that signature thin, even crust with slightly thicker edges that crisp up beautifully. This isn't your average frozen flatbread—it's restaurant-quality at home.
When baked at high heat (500°F or higher), the flatbread transforms into a golden, blistered masterpiece with a crisp exterior and chewy interior that pulls perfectly. The sauce should be simple—just tomato, garlic, and fresh basil—but applied in the right way to avoid sogginess.
Toppings are your canvas: think fresh mozzarella, prosciutto, roasted vegetables, or anything that excites you. The key is balance—don't overload, or you'll lose that perfect crisp.
What makes this recipe truly special is the versatility. Use it for quick weeknight suppers or impress guests with your wood-fired skills. The dough keeps well for days, so you can prep ahead and bake fresh whenever inspiration strikes.
Once you master this technique, you'll never go back to store-bought pizza again. Let's get started on creating your perfect flatbread pizza.
Ingredients for artisan flatbread pizza
Four dough ingredients transform into crispy-chewy perfection—this is your wood-fired flatbread pizza foundation.
| Ingredient | Amount | Notes |
|---|---|---|
| All-Purpose Flour 🌾 | 3 ½ cups | High-protein, bread flour preferred |
| Active Dry Yeast 🍞 | ¼ tsp | Ensure it's fresh (test in warm water) |
| Granulated Sugar 🍚 | ½ tsp | Feeds yeast for activation |
| Diamond Crystal Kosher Salt 🧂 | 1 ½ tsp | Fine grain for even distribution |
| Extra-Virgin Olive Oil 🫒 | ½ cup | High-quality, fruity variety |
| Warm Water 💧 | 1 ½ cups | 105-110°F for yeast activation |
| San Marzano Crushed Tomatoes 🍅 | ½ cup | Low-acid, sweet flavor |
| Fresh Garlic Cloves 🧄 | 4 cloves | Minced for aromatic base |
| Fresh Basil Leaves 🌿 | ¼ cup | Chopped for vibrant freshness |
| Fresh Mozzarella Cheese 🧀 | 8 oz | Low-moisture, sliced thin |
| Prosciutto D'Elicia 🥓 | 4 oz | Thinly sliced, premium quality |
| Extra-Virgin Olive Oil 🫒 | 1 tbsp | Drizzled after baking |
| Flaky Sea Salt 🧂 | 1 tsp | For finishing touch |
The flour is non-negotiable here. King Arthur or Caputo bread flour (if you can find it) gives that signature chew, but high-protein all-purpose works too. Yeast is your friend—Mazzoni or Red Star are reliable brands. The olive oil should be extra-virgin, fruity, and expensive—this is where flavor develops during fermentation. I always buy mine from Whole Foods or Trader Joe's for that fresh-pressed punch. Pro tip: if your yeast isn't fresh, it'll take forever to activate—test it in warm water first.
No San Marzano tomatoes? Any high-quality canned tomatoes work—just avoid the watery brands. Fresh basil is ideal, but dried oregano at half the amount gets you close in a pinch. That prosciutto? Prosciutto di Parma is the gold standard, but any good-quality Italian prosciutto will do. For the mozzarella, low-moisture is key—it won't make the pizza soggy. If you're feeling fancy, burrata on the side adds a creamy contrast. The garlic should be freshly minced—jarred garlic tastes like cardboard here.
This dough is a fermentation powerhouse—it keeps 5-7 days in the fridge, wrapped tightly in plastic. The sauce can be prepped 2 days ahead and stored in a jar. For the prosciutto, freeze it in portions to prevent spoilage. Once baked, these flatbreads reheat beautifully—375°F for 5-7 minutes revives that crispy edge. I always make a double batch—one for dinner, one for tomorrow's lunch. The leftovers? Freeze between parchment paper for up to 3 months—just bake straight from frozen at 500°F for 10-12 minutes.
Why You'll Love This Recipe
- Foolproof Dough: I swear, this dough comes together in five minutes—just flour, yeast, sugar, and olive oil. No kneading, no waiting hours, just mix, let it rise while you drink your coffee, and boom. That’s it.
- Crispy-Creamy Magic: The secret’s in the olive oil and kosher salt—thin edges get golden and shatteringly crisp, while the center stays pillowy soft. Honestly, that contrast is what makes it ridiculously good.
- Weeknight Superstar: Between us, this is my go-to when I’m too tired to order in. Toss on whatever’s in the fridge—sautéed veggies, leftover chicken, or just fresh mozzarella—and it’s dinner in 15. (Yes, even on a Tuesday night.)
- Budget-Friendly Feast: A single batch stretches for two pizzas, and the ingredients? Basic pantry staples. I’ve fed four people for under $8 with this—plus, the leftovers reheat like a dream (crispy again, no lie).
Step-by-step instructions for artisan flatbread pizza
Here's how to craft that perfect wood-fired crisp with chewy, stretchy perfection—every time.
Activate the Yeast for Maximum Rise
In a small bowl, combine the 1.5 cups warm water (between 105-110°F) with the 0.5 tsp granulated sugar and 0.25 tsp active dry yeast. Let it sit for 5-10 minutes until frothy—this confirms your yeast is alive and ready to work. If nothing happens after 10 minutes, your yeast is stale and needs replacing.
While waiting, mix the 3.5 cups all-purpose flour and 1.5 tsp diamond crystal kosher salt in a large bowl. The salt helps develop gluten, which gives that signature chewy texture. Once the yeast mixture bubbles vigorously, pour it into the flour and stir until a shaggy dough forms. Here's the thing—don't overmix yet. Just combine until no dry flour remains.
Knead and Rest for Gluten Development
Turn the dough onto a lightly floured surface and knead for 8-10 minutes until smooth and elastic. You're building gluten strands that trap gas during fermentation, which creates that perfect chewy texture. I press down firmly with the heels of my hands and fold the dough over itself—this builds strength without overworking it.
Once the dough is silky smooth, place it back in the bowl, cover with a damp towel, and let it rest at room temperature for 1 hour. This first rest allows the gluten to relax, making the final shaping easier. The dough should nearly double in size—this means your yeast is working its magic.
Shape and Proof for Wood-Fired Crisp
Preheat your oven to its highest setting (or use a pizza stone/steel on the highest rack) for 30 minutes. While it heats, divide the dough into 4 equal portions (about 1 pound each) and shape into rough balls. Cover and let them rest another 20 minutes—this final proofing ensures maximum oven spring when they hit the heat.
To shape each flatbread, gently press the dough ball with your fingertips from the center outward, rotating as you go. The edges should be slightly thicker than the center—this creates that beautiful charred crust while keeping the middle tender. Work quickly; the dough will firm up as it warms. Keep shaped flatbreads covered until ready to bake.
Assemble and Bake for Perfect Crisp
Heat 1 tablespoon extra-virgin olive oil in a skillet over medium-high heat until shimmering. Quickly transfer one flatbread to the skillet and cook for 1-2 minutes per side until golden brown spots appear. This pre-cooking step creates that wood-fired crisp without needing an actual fire.
Transfer the pre-cooked flatbread to a baking sheet. Spread 2 tablespoons san marzano crushed tomatoes over each, then top with minced garlic cloves, chopped fresh basil leaves, sliced fresh mozzarella cheese, and prosciutto d'elicia. Drizzle with remaining 1 tablespoon extra-virgin olive oil and sprinkle with 1 tsp flaky sea salt.
Finish with Wood-Fired Flair
Bake the assembled pizzas in the preheated oven for 10-12 minutes until the cheese is bubbly and the edges are deeply golden. The mozzarella should pull away slightly from the crust, and the prosciutto should be just warm through—not crispy. Watch closely after 8 minutes—the high heat works fast.
Remove from the oven and let rest for 2 minutes before slicing. The cheese will continue to melt slightly, creating that perfect pull-apart texture. Serve immediately with extra flaky sea salt and fresh basil leaves. Each bite should deliver that perfect balance of crispy crust, stretchy cheese, and savory toppings—just like your favorite wood-fired pizzeria.
Pro Tips For Making Artisan Flatbread Pizza
- STRETCH THE DOUGH LONG: I used to eyeball the resting time, and my flatbreads always ended up either too tight or too slack. For this recipe, let the dough stretch for at least 20 minutes—no, really, longer is better—until it’s visibly thinner than a tortilla and resists pulling back. That’s when the gluten relaxes enough to give you that perfect, airy bite.
- SALT THE YEAST WATER: Diamond Crystal kosher salt is less dense than table salt, so if you’re using it, dissolve the full 1 tsp in the warm water with the yeast—not just the flour. I learned this after my dough took forever to rise because the yeast was playing dead from lack of salt. Stir it in, wait 5 minutes, then add flour. Simple fix.
- DON’T RUSH THE FIRST RISE: I was skeptical until I tried it: cover the dough bowl with a damp towel instead of plastic wrap for the first rise. The towel lets moisture escape just enough to prevent a gummy texture while keeping the dough from drying out. Leave it in a warm spot (like a turned-off oven with a bowl of hot water) for 1.5–2 hours—yes, even if you’re eager to cook.
- OIL THE BOWL, NOT JUST THE DOUGH: This isn’t the prettiest method, but it’s the tastiest: lightly coat the bowl you’re letting the dough rise in with olive oil before adding the shaped dough. When you flip it onto parchment later, the oil prevents sticking and makes rolling out effortless. Less frustration, more crispy edges.
Common mistakes when making perfect results
Overloading Toppings
This is the #1 mistake I see beginners make—piling on too many toppings. A flatbread crust is delicate, and heavy toppings like thick slices of tomato or multiple layers of cheese will make it soggy instead of crispy.
Stick to 2-3 toppings max—think fresh mozzarella, prosciutto, and maybe roasted vegetables. Even a simple sauce like San Marzano tomatoes can weigh down the dough if overapplied. 🍅
Skipping Pre-Cooking
The skillet pre-cook step is non-negotiable for that wood-fired crisp. Without it, your flatbread will bake unevenly—soft in the middle and burnt at the edges. Heat 1 tbsp olive oil in a skillet until shimmering, then cook each flatbread for 1-2 minutes per side until golden.
This creates the perfect foundation for the high-heat oven finish.
Ignoring Dough Resting
Rushing the dough by skipping rests is a recipe for disaster. The 1-hour room temp rest after kneading and the 20-minute final proof are crucial for gluten development and oven spring.
If your flatbreads don't puff up in the oven, you likely skipped these steps. Patience here means that perfect chewy texture you're after.
Incorrect Sauce Application
Drizzling sauce directly from the jar onto your flatbread is a fast track to sogginess. Instead, spread 2 tbsp sauce per pizza in a thin, even layer—about ¼ inch thick.
Use the back of a spoon to smooth it out, leaving a ½-inch border around the edges for that crispy crust. Too much sauce = sad pizza.
Baking at Low Heat
Your oven needs to be 500°F or higher for that authentic wood-fired crisp. If your oven doesn't go that high, use a pizza stone or steel on the highest rack. Baking at 425°F will give you a soft, doughy flatbread instead of the crispy-chewy texture you want.
Invest in a thermometer to confirm your oven's actual temperature—many run 50°F cooler than set.
Overworking the Dough
Kneading too long develops too much gluten, which can make your flatbread tough instead of chewy. Aim for 8-10 minutes** of kneading—just until the dough is smooth and elastic.
If it feels resistant, let it rest longer rather than forcing it. The dough should spring back slowly when poked, not bounce back immediately like a ball.
Nutrition facts
Frequently asked questions
Can I make this flatbread pizza without a pizza stone?
The skillet pre-cook step is what creates that wood-fired crisp, so you don't need a stone. Use a heavy baking sheet or even a cast-iron skillet in the oven for even heat distribution. Just preheat your baking surface alongside the oven for 30 minutes to mimic the stone's effect.
How do I adjust the recipe for gluten-free flatbread?
Replace the all-purpose flour with a 1:1 gluten-free flour blend (like Bob's Red Mill) plus ½ tsp xanthan gum per cup. You'll need 1 extra tablespoon water per cup of flour since GF flours absorb differently. Let the dough rest 30 extra minutes after kneading to help develop structure.
What's the best way to reheat leftover flatbread pizza?
For that crispy texture, preheat oven to 400°F and bake for 5-7 minutes on a baking sheet. If using a skillet, warm it over medium heat and reheat for 1-2 minutes per side. Avoid microwaving—it makes the crust soggy. Leftovers keep 3-4 days refrigerated or 3 months frozen.
Can I use a different type of cheese besides mozzarella?
Yes! Try fontina for a nutty flavor or pecorino romano for sharpness. For melting, provolone or mozzarella-provolone blend works well. Avoid pre-shredded cheese—it contains anti-caking agents that prevent proper melting. Fresh burrata can be added after baking for creaminess.
Why did my flatbread turn out flat instead of puffy?
Most likely you skipped the proofing steps or didn't preheat the oven hot enough. Ensure your oven reaches 500°F+ and the dough has 20 minutes final proof at room temp. Also check your yeast—it should bubble vigorously within 5-10 minutes when activated. Cold dough won't rise properly!