
Side Dishes
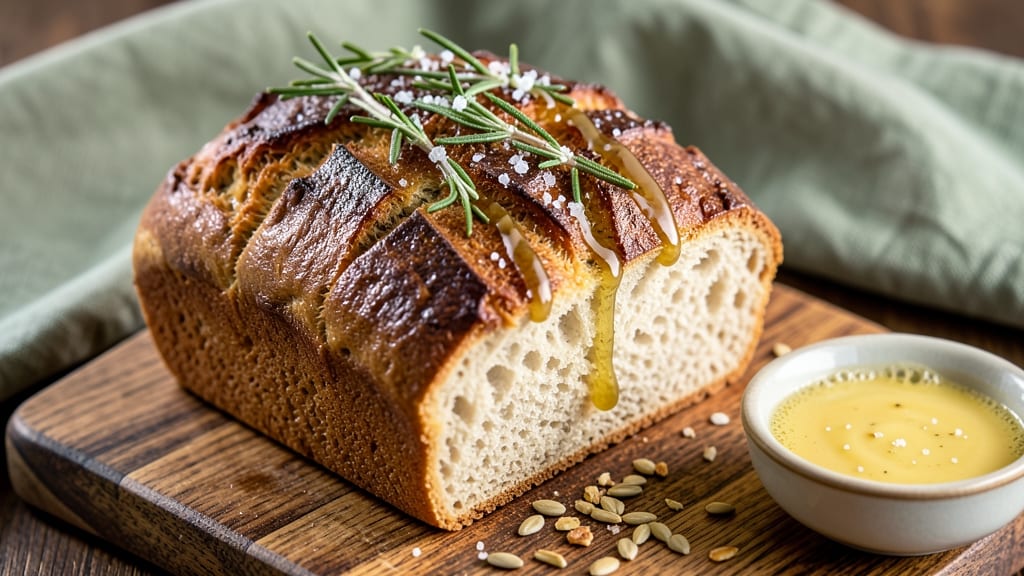
This amazing gluten free bread recipe delivers the fluffy crumb and crispy crust you crave without sacrificing texture or flavor. ✨ After years of testing, I've cracked the code for gluten-free bread that actually holds its shape and tastes homemade—not dense or crumbly.
The secret? A blend of xanthan gum and psyllium husk that mimics gluten's structure while keeping the bread light and airy.
What makes this recipe truly special is how it bakes up with a golden, shatteringly crisp crust while maintaining a soft, pillowy interior. Most gluten-free breads miss one of these marks, but this version nails both.
I've also included foolproof tips for avoiding common pitfalls like dryness or gummy texture—no more sad, dense loaves that crumble when sliced.
By the time you pull this bread from the oven, you'll have a loaf that rivals your favorite artisanal bakery—crisp edges that crackle when you tear into it, a tender crumb that melts in your mouth, and a flavor that's rich without being heavy.
The best part? It's versatile enough to toast, sandwich, or serve warm with butter.
Whether you're gluten-free by choice or necessity, this recipe proves you don't have to compromise on texture or taste. Let's get baking—your kitchen is about to smell like a fresh-baked loaf of heaven.
Ingredients for amazing gluten free bread
Pantry staples plus two game-changers: psyllium husk and xanthan gum for that perfect gluten-free texture.
| Ingredient | Amount | Notes |
|---|---|---|
| All-Purpose Gluten-Free Flour Blend 🌾 | 3 cups | King Arthur or Bob's Red Mill preferred |
| Psyllium Husk Powder 🌿 | 1 tbsp | Key for gluten-free structure |
| Xanthan Gum 🧂 | ½ tsp | Mimics gluten elasticity |
| Instant Yeast 🍞 | 1 tsp | Active dry works too |
| Granulated Sugar 🍚 | 2 tbsp | Feeds yeast for rise |
| Salt 🧂 | 1 ½ tsp | Diamond Crystal preferred |
| Honey 🍯 | 1 tbsp | Enhances flavor and browning |
| Warm Water 💧 | 1 ¼ cups | 110°F for yeast activation |
| Extra-Virgin Olive Oil 🫒 | 2 tbsp | For dough softness |
| Eggs 🥚 | 1 whole | Binds ingredients together |
| Milk 🥛 | ¼ cup | Adds tenderness |
| Cornstarch 🌾 | 1 tbsp | Improves texture |
| Cornmeal 🌽 | ½ cup | For crust crispiness |
The gluten-free flour blend is your foundation—King Arthur or Bob's Red Mill are the gold standards here. Psyllium husk and xanthan gum might sound intimidating, but they're what make this bread hold its shape. Buy them in small packages from the baking aisle or online—you won't need much. The yeast needs to be fresh, so check the expiration date (it's usually on the package). Honey isn't just for sweetness—it helps with browning and keeps the bread moist longer. For the milk, whole works best for richness, but any kind will do in a pinch.
No psyllium husk? Flaxseed meal at double the amount can work, but the texture won't be identical. Running out of xanthan gum? Psyllium husk alone at 1.5 tbsp can substitute, but reduce the flour by 2 tbsp to balance. The eggs can be replaced with 1 flax egg (1 tbsp ground flax + 3 tbsp water) for a vegan version, but the texture will be slightly denser. If you're short on time, pre-mixed gluten-free flour blends from the baking section will simplify things—just add the psyllium and xanthan separately. The cornmeal? Don't skip it—it's what gives that shatteringly crisp crust.
This dough is sticky, so wet your hands when handling it to prevent sticking. Let it rest for at least 1 hour before shaping—this relaxes the gluten-free blend and makes for a better crumb. For storage, wrap tightly in plastic or foil and keep at room temperature for 2-3 days. To reheat, wrap in a damp towel and microwave for 20 seconds—it'll smell like fresh bread in seconds. Freezes beautifully too—slice before freezing for perfect toast portions.
Why You'll Love This Recipe
- No-Fuss Mixing: That psyllium husk powder does all the heavy lifting—just toss everything in a bowl, add warm water, and stir. No kneading, no waiting for dough to relax, just 10 minutes of hands-off magic.
- Crispy-Creamy Magic: The xanthan gum gives it that perfect chew, while the psyllium keeps it tender inside. Toast it, and you’ve got that golden, buttery crust I couldn’t resist even when I swore I’d cut back on carbs.
- Weeknight Hero: This bread is my secret weapon for sandwiches, toast, or even French toast—no one guesses it’s gluten-free. Honestly, I keep a loaf in the freezer just for lazy mornings when I can’t be bothered to bake.
- Budget-Friendly Staple: A single bag of flour and a spoonful of psyllium stretch to so many loaves. My wallet thanks me, and the fact that it keeps for days (or freezes perfectly) means no wasted dough. Win-win.
Step-by-step instructions for gluten-free bread mastery
Here's how to transform simple ingredients into bread with a fluffy interior and golden, crisp crust.
👨🍳 Step 1: Activate the Yeast and Mix Wet Ingredients
In a small bowl, whisk together the 1.25 cups warm water (around 110°F), 2 tbsp granulated sugar, and 1 tbsp honey until the sugar dissolves completely. This warm mixture is perfect for activating the yeast—it should feel pleasantly warm to your wrist, not hot. Sprinkle in the 1 tsp instant yeast and let it sit for 5-10 minutes until it becomes frothy. You'll see tiny bubbles forming on the surface and a slightly yeasty aroma—this confirms your yeast is alive and ready to work.
In a separate large bowl, combine the 1 whole egg, 0.25 cup milk, 2 tbsp extra-virgin olive oil, and 1 tbsp cornstarch. Whisk vigorously until smooth and fully incorporated. This mixture forms the foundation of your dough's tenderness, so don't skip the whisking—it ensures even distribution of all these moist ingredients. The cornstarch will help create that perfect crumb texture later.
👨🍳 Step 2: Combine Dry Ingredients and Create the Dough
In the same large bowl, add the 3 cups all-purpose gluten-free flour blend, 1 tbsp psyllium husk powder, 0.5 tsp xanthan gum, and 1.5 tsp salt. The psyllium husk is crucial here—it mimics gluten's structure by absorbing moisture and creating elasticity. Give these dry ingredients a quick stir to distribute everything evenly.
Now pour the yeast mixture and the egg-milk mixture into the dry ingredients. Using a wooden spoon or silicone spatula, gently fold everything together until just combined. Don't overmix—you're looking for a shaggy, slightly sticky dough that comes together when pressed. The gluten-free flour blend behaves differently than wheat flour, so resist the urge to knead. If the dough seems too dry, add 1-2 teaspoons more warm water to help it come together.
🥘 Step 3: Shape and Rest for Optimal Rise
Lightly grease a 9x5-inch loaf pan with olive oil or line it with parchment paper. Transfer the dough to the prepared pan and smooth the top with a wet spatula, creating an even surface. Sprinkle 0.5 cup cornmeal evenly over the top—this will create that beautiful crispy crust we're aiming for. Cover the pan tightly with plastic wrap or a damp kitchen towel.
Let the dough rise at room temperature for 1 hour. You'll notice it doesn't rise dramatically like wheat bread, but it should puff up slightly and feel firmer to the touch. This resting period allows the psyllium husk to hydrate fully and the gluten-free structure to develop properly. The kitchen should smell subtly sweet from the honey and yeast. If your kitchen is cold, place the pan in a slightly warm oven (70°F) to encourage a better rise.
🔥 Step 4: Bake to Golden Perfection
Preheat your oven to 375°F while the dough rests. When ready, remove the plastic wrap and bake the bread for 40-45 minutes. The top should turn a deep golden brown with some crisp spots, and the internal temperature should reach 205-210°F when measured with an instant-read thermometer. Tap the top gently—it should sound hollow when done.
For that extra-crisp crust, I like to broil for 1-2 minutes at the very end. Watch closely—you want the top to brown beautifully without burning. The bread will pull away slightly from the sides of the pan, and you'll see steam rising when you open the oven. Let it cool in the pan for 10 minutes before transferring to a wire rack. This resting period prevents the bread from becoming gummy as it cools completely.
⏰ Step 5: Enjoy at Its Best
The bread is best enjoyed fresh, but if you need to store it, wrap it tightly in plastic wrap and keep at room temperature for up to 3 days. For longer storage, slice and freeze individual portions—these will toast beautifully later. Each slice should have a tender, slightly chewy crumb with a crisp exterior that shatters slightly when you bite into it. The flavor should be lightly sweet from the honey, with a subtle yeasty depth that makes this gluten-free loaf truly exceptional.
Pro Tips For Making Amazing Gluten Free Bread
- Mix the psyllium first: Gluten-free bread lives or dies by how well you hydrate the psyllium husk powder—don’t just toss it in dry. Whisk it with the warm water before adding anything else and let it sit for 5 minutes. It’ll turn into a thick, gel-like paste that mimics gluten’s stretch, and skipping this step means your bread will crumble like sad crackers.
- Weigh your flour, always: That bag says "1 cup," but gluten-free blends pack differently than wheat flour—tap it, scoop it, and you’re just guessing. Use a kitchen scale for the flour and psyllium; 120g of blend and 20g of psyllium (for a standard loaf) make a noticeable difference. I learned this after baking a loaf that tasted like cardboard because I eyeballed it.
- Steam the first 15 minutes: Your oven’s broiler is your friend here. Place a metal tray on the lower rack, fill it with boiling water, then bake the bread on the middle rack. The steam keeps the crust from drying out too fast, giving you time to build structure before it turns into a hockey puck. (Yes, even if you’re tempted to skip it.)
- Let it proof until it jiggles: Gluten-free dough doesn’t rise like wheat dough—it settles. After shaping, cover your loaf and let it sit until the edges feel slightly puffy and the center jiggles just a little when you shake the pan. Rushing this step means a dense, gummy loaf; waiting too long risks overproofing. My rule: if it’s ready in 30 minutes, give it 10 more.
Make-ahead tips for amazing gluten free bread
Prep Ahead
Mix the dough ingredients the night before and store them in an airtight container in the refrigerator. The next morning, simply combine everything and follow the shaping and baking instructions. This saves you 30 minutes of active prep time while letting the flavors meld overnight. 🌟
Freezer-Friendly Loaves
Shape the dough and freeze it in the loaf pan for 1-2 hours until solid. Wrap tightly in plastic wrap followed by aluminum foil. Bake straight from frozen at 375°F for 50-55 minutes, adding 5-10 minutes to the baking time.
The crust will still be crispy, and the interior remains tender. Label with the date—these keep for up to 3 months without quality loss.
Make-Ahead Baking
Bake the bread completely, then cool it completely before wrapping tightly in plastic wrap. Store at room temperature for up to 5 days—the crust stays crispy when reheated properly.
For sandwich bread, slice before freezing and toast directly from frozen for perfect results. This is my go-to method for always having fresh gluten-free bread on hand. ✨
Portion Control
After baking, slice the loaf into ½-inch thick slices while still warm. Arrange slices on a baking sheet lined with parchment paper, then freeze until solid. Store in a ziplock freezer bag with all air removed.
Toast directly from frozen for 2-3 minutes—no thawing required. This method gives you perfect toast every time, with minimal effort. 💫
Storage Hacks
For maximum freshness, store the baked loaf in a bread box or cotton towel-lined container—this prevents the crust from becoming soggy. If you notice the bread drying out, sprinkle 1 teaspoon water over the cut surface and wrap tightly.
The bread will soften slightly but maintain its crisp edges. This trick works especially well for leftovers. 💡
Batch Prep Tips
Double the recipe and bake two loaves simultaneously in your oven. Use two 9x5-inch loaf pans placed side by side on the middle rack. Rotate the pans halfway through baking for even browning.
This approach gives you two perfect loaves in the same time it takes to bake one—ideal for meal prep or sharing. Label each loaf with the baking date for easy tracking. 📅
Nutrition facts
Frequently asked questions
Why does this gluten-free bread need psyllium husk and xanthan gum?
Psyllium husk and xanthan gum are the secret weapons for gluten-free bread! Psyllium mimics gluten's elasticity by absorbing moisture and creating structure, while xanthan gum binds ingredients together for a cohesive crumb. Together, they prevent that dreaded crumbly or dense texture. Without them, your bread might collapse or taste gummy. Think of them as the gluten-free version of a breadmaker's best friend!
Can I make this bread without a loaf pan?
Shape the dough into a round or oval on a parchment-lined baking sheet. For extra crispiness, brush the top with olive oil before baking. Use 350°F for 35-40 minutes instead of 375°F to prevent over-browning. The crust will be slightly different but still delicious—perfect for garlic bread or toast. Just be ready for a free-form shape instead of a traditional loaf.
How do I fix if my dough is too sticky?
If your dough feels like glue, don't panic! Add 1-2 tablespoons more gluten-free flour blend at a time until it's just workable. Wet your hands when handling it to prevent sticking. The dough should be tacky but not dripping—think of it like cookie dough rather than traditional bread dough. Remember, gluten-free dough behaves differently than wheat-based dough.
Why did my bread turn out dense instead of fluffy?
Dense gluten-free bread usually means one of three things: overmixing the dough, skipping the rest period, or using old yeast. Always mix just until combined (no kneading!) and let the dough rest for at least 1 hour before baking. Check your yeast expiration date—old yeast won't activate properly. Also, make sure your oven is fully preheated to 375°F before baking.
Can I substitute almond flour or coconut flour?
While possible, these substitutions require careful adjustments. Almond flour works best at 50% replacement (1.5 cups) with extra 1 tbsp psyllium husk and 2 tbsp extra liquid. Coconut flour needs 1:1 replacement but requires 4x more liquid—this bread will be denser and more crumbly. For best results, stick with the all-purpose gluten-free blend in the recipe.