
Side Dishes
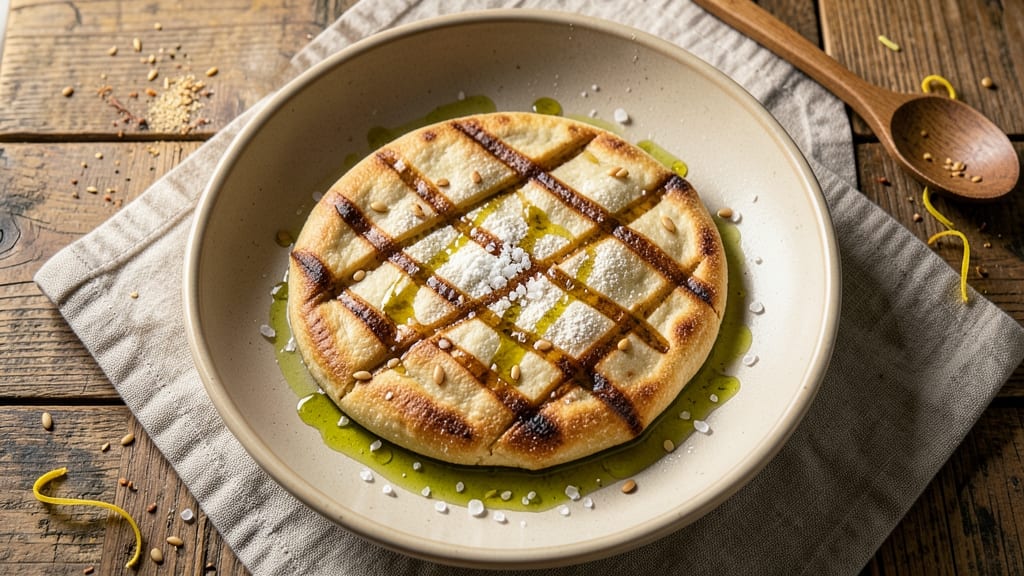
This artisan flat bread recipe delivers the perfect balance of crispy crust and pillowy centers—just like you'd find in a traditional wood-fired oven. The secret lies in precise dough preparation, proper proofing, and high-heat baking that transforms simple ingredients into restaurant-quality bread.
I've refined this method over years of testing, ensuring every bite delivers that satisfying contrast of textures.
At its core, this recipe relies on a straightforward dough made with high-protein flour, water, yeast, and salt—no fancy ingredients required. The key steps include kneading just enough to develop gluten, letting the dough rest to relax, and shaping it into thin rounds before proofing.
Modern adaptations like using a Dutch oven or pizza stone can replicate wood-fired results in your home kitchen.
When baked at 500°F for just 5-7 minutes, the bread develops a golden, crispy exterior while staying soft and airy inside. The high heat creates steam that keeps the center tender, while the crust achieves that coveted crackly texture.
This method ensures consistent results every time, whether you're serving it with soups, dips, or as a side to your main dish.
For extra flavor, brush the baked bread with olive oil and sprinkle with flaky salt or fresh herbs. The possibilities for customization are endless—try adding garlic powder, sesame seeds, or even a sprinkle of za'atar for a Middle Eastern twist. Let's get started on creating your perfect artisan flat bread.
Ingredients for artisan flat bread
Nine essential ingredients transform into restaurant-quality flat bread with crispy crusts and pillowy centers.
| Ingredient | Amount | Notes |
|---|---|---|
| High-Protein Bread Flour 🌾 | 3 cups | 13-14% protein for structure |
| Active Dry Yeast 🍞 | 1 tsp | Ensure it's fresh (test in warm water) |
| Granulated Sugar 🍚 | 1 tbsp | Feeds yeast for activation |
| Warm Water 💧 | 1 ¼ cups | 105-110°F for yeast activation |
| Kosher Salt 🧂 | 1 ½ tsp | Diamond Crystal preferred |
| Olive Oil 🫒 | 1 tbsp | Extra-virgin for finishing |
| Semolina Flour 🌾 | ¼ cup | For dusting and texture |
| Flaky Sea Salt 🧂 | ¼ tsp | Maldon or Jacobsen preferred |
| Garlic Powder 🧄 | ½ tsp | Optional for flavor variation |
The high-protein bread flour is non-negotiable here—look for King Arthur or Caputo if you're serious about texture. Bulk bins at Whole Foods or King Arthur's website are reliable sources. Fresh yeast is critical; if your packet doesn't foam in warm water within 5 minutes, toss it. The semolina flour adds that signature crunch—Trader Joe's sells it pre-packaged if you don't want to hunt for it. For the finishing touch, Maldon flaky salt gives that professional crunch, but Diamond Crystal works in a pinch if you're in a hurry.
No active dry yeast? Instant yeast at half the amount works too. Short on semolina? All-purpose flour stretches it, though texture will be slightly less crisp. The olive oil matters—use extra-virgin for that fruity finish. Want extra flavor? Swap garlic powder for za'atar seasoning (just 0.5 tsp) or crushed red pepper flakes for a kick. The dough should be slightly tacky but not sticky—add a splash more water if needed, but don't overdo it.
This dough keeps for 2 days in the fridge wrapped tightly in plastic. For longer storage, freeze shaped rounds on a tray, then transfer to a bag for up to 3 months. Thaw at room temperature before baking. The baked bread stays crispy for 24 hours if stored in a paper bag at room temperature—perfect for meal prep. Brush with fresh olive oil right after baking for maximum crispiness.
Why You'll Love This Recipe
- No-Knead Magic: I swear by this dough—just mix, rest, and roll. The high-protein flour gives it that satisfying chew without a single punch to the counter.
- Crispy-Creamy Payoff: That warm water and sugar combo wakes up the yeast just right, giving you a crust so golden it cracks when you pull it off the pan—while the inside stays pillowy.
- Weeknight Swiss Army Knife: Spread with olive oil and dip into marinara for dinner, tear over salads for lunch, or freeze half for when you’re too tired to cook. (Yes, even on a Tuesday night.)
- Budget-Friendly Staple: Five ingredients, zero waste—this dough stretches further than store-bought, and the leftovers toast up like fresh bread the next day. My wallet thanks me every time.
Step-by-step instructions for artisan flat bread
This method delivers restaurant-quality texture with a crispy crust and soft interior every time.
Activate the Yeast for Maximum Rise
In a small bowl, combine the 1.25 cups warm water (between 105-110°F), 1 tbsp granulated sugar, and 1 tsp active dry yeast. Let it sit for 5-10 minutes until frothy—this confirms your yeast is alive and ready to work. If it doesn't bubble, your yeast may be dead, and you'll need to start over.
I always test my yeast first because cold water kills it instantly, and old yeast won't activate. Once you see vigorous bubbles forming, your dough will have the perfect lift for that signature pillowy texture. This step ensures your bread rises properly without developing a dense, flat crumb.
Mix and Knead the Dough for Structure
In the bowl of a stand mixer fitted with the dough hook, combine the 3 cups high-protein bread flour, 1.5 tsp kosher salt, and 0.5 tsp garlic powder (if using). Add the yeast mixture and mix on low speed for 2 minutes until combined. Then increase to medium speed and knead for 5-7 minutes until the dough forms a smooth, elastic ball that pulls away from the bowl.
The high-protein flour is crucial here—it develops gluten strands that give your flat bread both structure and chewiness. If the dough feels sticky, add 1 tablespoon flour at a time until it comes together. Kneading by hand works too, but use a dough scraper to keep it from sticking to your work surface. The dough should be soft but not wet.
First Rise for Optimal Flavor Development
Lightly oil a large bowl, place the dough inside, and cover with a damp kitchen towel. Let it rise in a warm place (like your oven with the light on) for 1-2 hours, or until it has doubled in size. The dough should feel springy when pressed gently—this indicates proper fermentation and flavor development.
Don't rush this step. The longer the rise (up to 2 hours), the more complex flavors your bread will develop. If your kitchen is cold, place the bowl on top of your turned-off oven with the light on to create a warm, consistent environment. Overproofing is less of a concern here because we're making flat bread, but underproofing will result in a dense, heavy texture.
Shape and Rest for Even Cooking
Punch down the risen dough to release air, then divide it into 4 equal pieces. Roll each piece into a 12-inch circle on a lightly floured surface, keeping the edges slightly thicker than the center. Dust each round generously with 0.25 cup semolina flour—this prevents sticking and adds that signature rustic texture.
Let the shaped dough rest for 15-20 minutes before baking. This short rest relaxes the gluten strands, making them easier to work with and preventing the bread from puffing up too much in the oven. The semolina flour gives the crust that beautiful golden crust and prevents the dough from sticking to your baking surface or peel.
Bake for Crispy Crust and Soft Interior
Preheat your oven to 450°F with a pizza stone or baking sheet inside. Once hot, carefully transfer each dough round to the stone or sheet, spacing them 1 inch apart. Bake for 8-10 minutes until the edges are deep golden brown and the centers are still slightly soft to the touch.
Here's the secret: The bread will finish cooking as it sits on a wire rack. If you pull it out too early, the crust won't be crispy enough. For extra crispiness, I like to sprinkle 0.25 tsp flaky sea salt on each round just before baking. Serve immediately while still warm for that perfect contrast of crispy exterior and soft interior.
Pro Tips For Making Artisan Flat Bread
- STRETCH THE DOUGH HARD: I learned this the hard way—skipping the 10-minute stretch on a lightly floured surface leaves your flatbread dense and chewy. Press it until it’s paper-thin, then fold it like a letter before rolling out again. That extra effort gives you the signature crispness and chew.
- WEIGH YOUR FLOUR: Using cups for high-protein bread flour is a recipe for disaster—it packs differently every time. Invest in a kitchen scale and measure 350 grams (about 3 cups) for consistency. Trust me, your flatbread’s texture will thank you more than your patience will.
- LET THE YEAST PROOF AT ROOM TEMP: That warm water trick? It’s not enough. After mixing, let the dough sit in a bowl covered with a damp towel for 30 minutes at room temp before refrigerating. This gives the yeast a head start, so your flatbread rises faster when it’s time to shape—no more waiting around for lazy fermentation.
- SEAR IN BATCHES: Crowding the pan turns your flatbread into a sad, greasy pancake. Cook two at most per heat, and resist the urge to flip too soon—wait for those edges to pull away and form bubbles. A hot cast-iron skillet is your friend here; no, you don’t need a fancy comal.
Dietary considerations for this dish
Gluten-Free Adaptation
For a gluten-free version, replace the high-protein bread flour with a 1:1 gluten-free flour blend like King Arthur Measure for Measure or Bob's Red Mill 1-to-1. Add 1 tsp xanthan gum to help mimic gluten's structure.
The dough will be less elastic, so handle it gently when shaping—avoid overworking it. Proofing time may extend to 2-3 hours due to reduced gluten development. 🌾
Dairy-Free Option
This recipe is naturally dairy-free, but if you're using semolina flour with dairy traces, opt for certified dairy-free semolina or substitute with all-purpose flour. For extra richness, brush baked bread with avocado oil instead of olive oil.
The flavor remains identical, and the texture stays crispy. Always check labels on flours and oils for hidden dairy. ✨
Vegan Modifications
Swap the active dry yeast for nutritional yeast (same amount) to keep the recipe vegan. Use vegan olive oil (like Primo brand) and ensure your flaky sea salt is vegan-certified.
The dough's structure remains intact, and the baking process doesn't change. For extra flavor, add 1 tsp dried rosemary to the dough during kneading. 💚
Low-Carb Version
Reduce the 3 cups high-protein bread flour to 2 cups and add 1 cup almond flour for a lower-carb option. The dough will be drier, so add 1 extra tablespoon warm water.
Bake at 475°F for 7-9 minutes—the higher heat helps crisp the crust faster. Expect a slightly denser texture but with a satisfying crunch. 🥑
Allergen-Friendly Tips
For egg-free needs, no changes are needed—this recipe doesn't contain eggs. If you're sensitive to sulfites, use sulfite-free yeast (like Red Star Sulfite-Free). For nut-free kitchens, ensure your garlic powder is processed in a nut-free facility. Always double-check labels on all ingredients to avoid cross-contamination. 🛡️
Nutrition facts
Frequently asked questions
Can I make this flat bread without a stand mixer?
The dough can be mixed and kneaded by hand on a lightly floured surface. Use a dough scraper to keep it from sticking to your hands or counter. Knead for about 8-10 minutes until the dough becomes smooth and elastic. The key is consistent pressure—press, fold, and turn the dough repeatedly.
Why is my flat bread dense instead of crispy?
Dense flat bread usually results from underproofing or overworking the dough. Make sure your dough rises until it doubles in size (1-2 hours) and feels springy. Also, avoid kneading too long—just until the dough pulls away from the bowl. For extra crispiness, bake at 500°F for 5-7 minutes on a preheated pizza stone or baking sheet.
How do I store leftover flat bread?
Keep your flat bread crispy by storing it in a paper bag at room temperature for up to 24 hours. For longer storage, wrap individual pieces in foil and freeze for up to 3 months. Reheat in a 350°F oven for 3-5 minutes to restore crispiness. Avoid plastic bags—they trap moisture and make the bread soggy.
Can I add herbs or spices to the dough?
Yes! Try adding 1 tsp dried rosemary, 1 tsp za'atar seasoning, or ½ tsp smoked paprika during kneading for extra flavor. For fresh herbs like parsley or thyme, mix them in after shaping but before proofing. Just be mindful—too many additions can affect texture. Start with small amounts and adjust to taste.
What's the best way to reheat flat bread?
For crispy results, place flat bread on a baking sheet and heat in a 400°F oven for 3-5 minutes. Toaster ovens work too—set to 375°F for 2-3 minutes. Avoid microwaving; it makes the bread rubbery. For extra flavor, brush with olive oil before reheating.